 第03章-Redis客户端
# 客户端选择
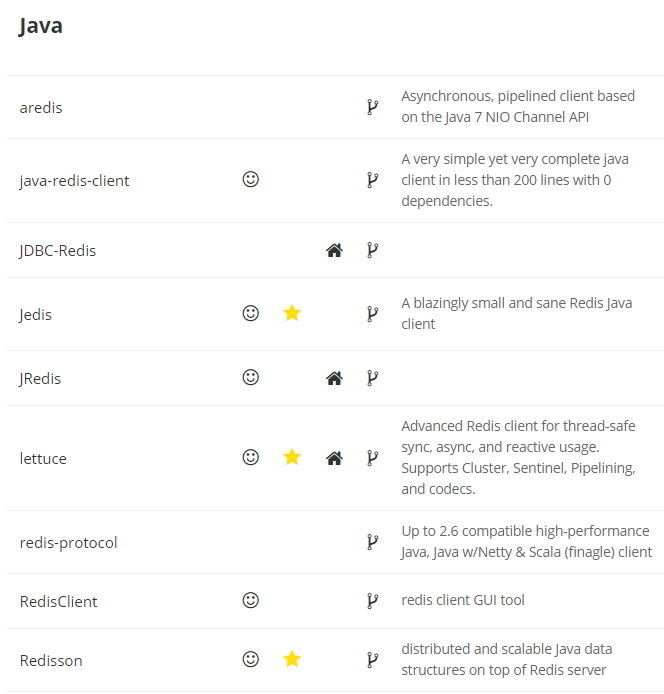
Redis客户端的选择:官网列表 (opens new window),里面罗列了各种语言的客户端,同时标记😊和⭐,为优秀客户端
# 一、Java客户端:Jedis
# 1.1 基本使用
引入依赖
<dependency>
	<groupId>redis.clients</groupId>
    <artifactId>jedis</artifactId>
    <version>2.9.0</version>
    <scope>compile</scope>
</dependency>
1
2
3
4
5
6
2
3
4
5
6
创建 Jedis 连接对象
// 1. 生成一个 Jedis 对象,这个对象负责和指定 Redis 节点进行通信
Jedis jedis = new Jedis("127.0.0.1", 6379);
// 2. jedis 执行 set 操作
jedis.set("hello", "world");
// 3. jedis 执行 get 操作,value="world"
String value = jedis.get("hello");
1
2
3
4
5
6
2
3
4
5
6
Jedis 客户端构造函数:
Jedis(String host, int port, int connectionTimeout, int soTimeout)
host:Redis 节点的所在机器的 IPport:Redis 节点的端口connectionTimeout:客户端连接超soTimeout:客户端读写超时
简单使用
// 1. string
// 输出结果:OK
jedis.set("hello", "world");
// 输出结果:world
jedis.get("hello");
// 输出结果:1
jedis.incr("counter");

// 2. hash
jedis.hset("myhash", "f1", "v1");
jedis.hset("myhash", "f2", "v2");
// 出结果:{f1=v1, f2=v2}
jedis.hgetAll("myhash");

// 3. list
jedis.rpush("mylist", "1");
jedis.rpush("mylist", "2");
jedis.rpush("mylist", "3");
//输出结果:[1,2,3]
jedis.lrange("mylist", 0, -1);

// 4. set
jedis.sadd("myset", "a");
jedis.sadd("myset", "b");
jedis.sadd("myset", "a");
// 输出结果:[b,a]
jedis.smembers("myset");

// 5. zset
jedis.zadd("myzset", 99, "tom");
jedis.zadd("myzset", 66, "peter");
jedis.zadd("myzset", 33, "james");
// 输出结果:[["james"],33.0],[["peter"],66.0],["tom],99.0]
jedis.zrangeWithScores("myzset", 0, -1);
1
2
3
4
5
6
7
8
9
10
11
12
13
14
15
16
17
18
19
20
21
22
23
24
25
26
27
28
29
30
31
32
33
34
2
3
4
5
6
7
8
9
10
11
12
13
14
15
16
17
18
19
20
21
22
23
24
25
26
27
28
29
30
31
32
33
34
# 1.2 Jedis 直连和连接池
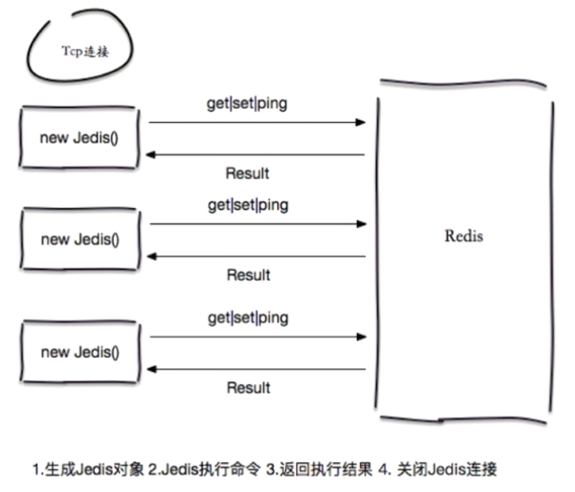
1. Jedis 直连
2. Jedis 连接池
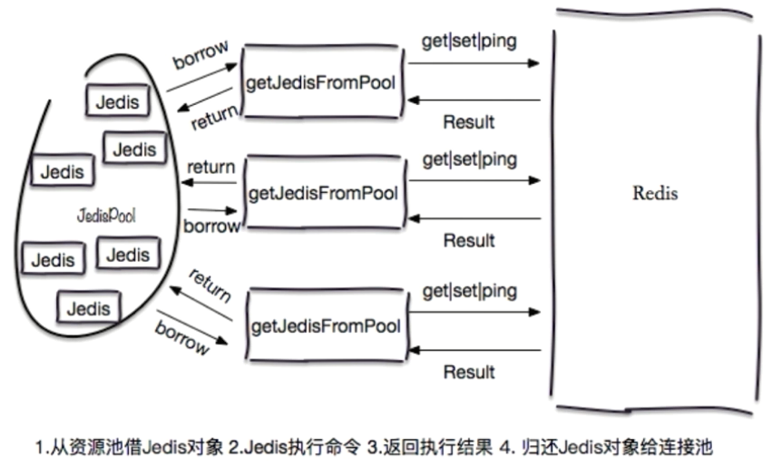
Jedis 连接池的基本使用:
// 初始化 Jedis 连接池,通常来讲 JedisPool 是单例的。
GenericObjectPoolConfig poolConfig = new GenericObjectPoolConfig();
JedisPool jedisPool = new JedisPool(poolConfig, "127.0.0.1", 6379);

Jedis jedis = null;
try {
    // 1. 从连接池获取 jedis 对象
    jedis = jedisPool.getResource();
    // 2. 执行操作
    jedis.set("hello", "world");
} catch (Exception e) {
    e.printStackTrace;
} finally {
    if (jedis != null)
        // 如果使用 JedisPool, close 操作不是关闭连接,代表归还连接池
        jedis.close();
}
1
2
3
4
5
6
7
8
9
10
11
12
13
14
15
16
17
2
3
4
5
6
7
8
9
10
11
12
13
14
15
16
17
3. 方案对比
| 优点 | 缺点 | |
|---|---|---|
| 直连 | - 简单方便 - 适用于少量长期连接的场景 | - 存在每次新建/关闭 TCP 开销 - 资源无法控制,存在连接泄露的可能 - Jedis 对象线程不安全 |
| 连接池 | - Jedis 预先生成,降低开销使用 - 连接池的形式保护和控制资源的使用 | 相对于直连,使用相对麻烦,尤其在资源的管理上需要很多参数来保证,一旦规划不合理也会出现问题 |
# 二、Python 客户端:redis-py
参考 github 仓库:andymccurdy/redis-py (opens new window)
1. redis-py 安装
# 方式一:pip
> pip install redis

# 方式二:easy_install
> easy_install redis

# 方式三:源码安装
> wget https://github.com/andymccurdy/redis-py/archive/2.10.5.zip
> unzip redis-2.10.5.zip
> cd redis-2.10.5
> sudo python setup.py install
1
2
3
4
5
6
7
8
9
10
11
2
3
4
5
6
7
8
9
10
11
2. redis-py 基本使用
# 导入使用
import redis
client = redis.StrictRedis(host=127.0.0.1,port=6379)
key="hello"
setResult = client.set(key, "python-redis")
print setResult
value = client.get(key)
print "key:" + key + ",value:" + value

# 1. string
# 输出结果:True
client.set("hello", "world")
# 输出结果:world
client.get("hello")
# 输出结果:1
client.incr("counter")

# 2. hash
client.hset("myhash", "f1", "v1")
client.hset("myhash", "f2", "v2")
# 输出结果:{(f1:v1, f2:v2}
client.hgetall("myhash")

# 3. list
client.rpush("mylist", "1")
client.rpush("mylist", "2")
client.rpush("mylist", "3")
#输出结果:['1', '2', '3']
clientIrange("mylist", 0, -1)

# 4. set
client.sadd("myset", "a")
client.sadd("myset", "b")
client sadd("myset", "a")
#输出结果:set(['a', 'b'])
client.smembers("myset")

# 5. zset
client.zadd("myzset", "99", "tom")
client.zadd("myzset", "66", "peter")
client.zadd("myzset", "33", "james")
#输出结果:[('james', 33.0), ('peter', 66.0), ('tom', 99.0)]
client.zrange("myzset", 0, -1, withscores=True)
1
2
3
4
5
6
7
8
9
10
11
12
13
14
15
16
17
18
19
20
21
22
23
24
25
26
27
28
29
30
31
32
33
34
35
36
37
38
39
40
41
42
43
2
3
4
5
6
7
8
9
10
11
12
13
14
15
16
17
18
19
20
21
22
23
24
25
26
27
28
29
30
31
32
33
34
35
36
37
38
39
40
41
42
43
# 三、Go 客户端:redigo
连接:
c, err := redis.Dial("tcp", "127.0.0.1:6379")
if err != nil {
    fmt.Println(err)
    return
}
defer c.Cloes()
1
2
3
4
5
6
2
3
4
5
6
使用:
v, err := c.Do("SET", "hello", "world")
if err != nil {
    fmt.Println(err)
    return
}
fmt.Println(v)
v, err = redis.String(c.Do("GET", "hello"))
if err != nil {
    fmt.Println(err)
    return
}
1
2
3
4
5
6
7
8
9
10
11
2
3
4
5
6
7
8
9
10
11
编辑 (opens new window)
上次更新: 2023/06/04, 12:34:19