 第01章-基础篇
# 1.1 环境准备和概述
# 1.1.1 环境准备
使用CentOS 7,执行以下命令进行初始化:
# 确认网络
ping www.baidu.com
# 确认yum可用
yum list|grep gcc
# 确认关闭iptables规则
iptables -L
iptables -F
iptables -t nat -L
iptables -t nat -F
# 确认停用selinux
getenforce
setenforce 0

# 安装gcc相关
yum -y install gcc gcc-c++ autoconf pcre pcre-devel make automake
# 安装相关工具
yum -y install wget http-tools vim

# 创建相关路径
cd /opt
mkdir app backup download logs work
2
3
4
5
6
7
8
9
10
11
12
13
14
15
16
17
18
19
20
21
# 1.1.2 Nginx概述
中间件示意图:
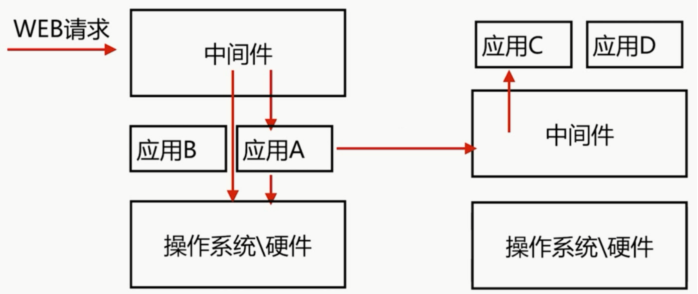
Nginx是一个开源且高性能、可靠的HTTP中间件、代理服务。
# 1.2 Nginx特性
- IO多路复用epoll
- 轻量级
- CPU亲和
- sendfile
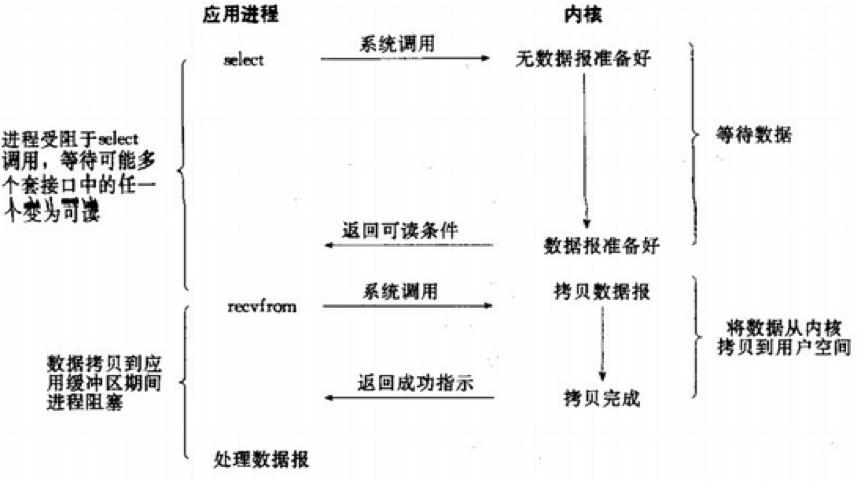
# 1.2.1 特性一 IO多路复用epoll
什么是IO复用?

什么是IO多路复用?
多个描述符的I/O操作都能在一个线程内并发交替地顺序完成,这就叫I/O多路复用,这里的“复用”指的是复用同一个线程。
什么是epoll?
IO多路复用的实现方式select、poll、epoll
什么是select?
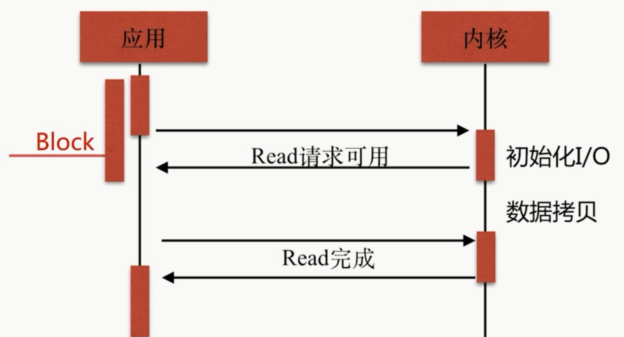
select缺点:
- 能够监视文件描述符的数量存在最大限制
- 线性扫描效率低下
epoll模型有点:
- 每当FD就绪,采用系统的回调函数之间将fd放入,效率更高。
- 最大连接无限制
# 1.2.2 特性二 轻量级
功能模块少,代码模块化
# 1.2.3 特性三 CPU亲和
为什么需要CPU亲和
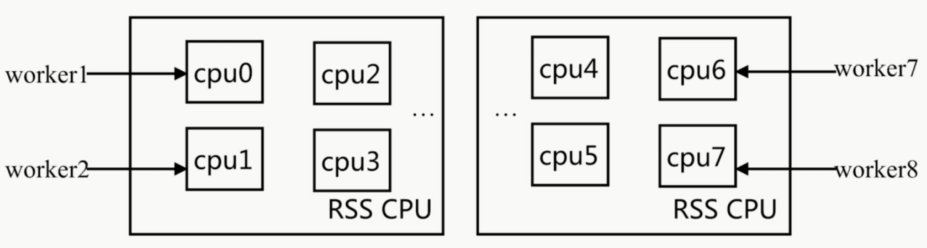
什么是CPU亲和?
是一种把CPU核心和Nginx工作进程绑定方式,把每个worker进程固定在一个cpu上执行,减少切换cpu的cache miss,获得更好的性能。
# 1.2.4 特性四 sendfile
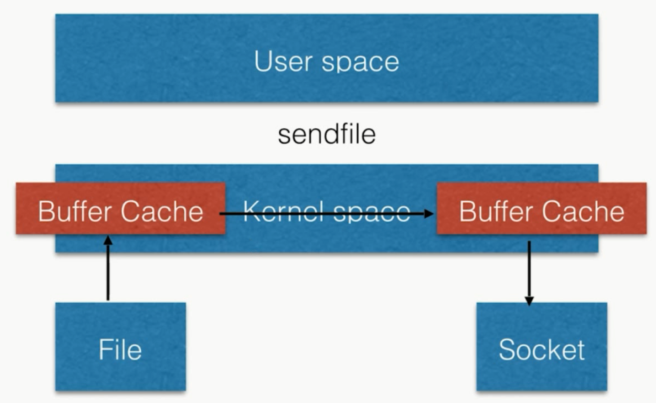
Nginx处理静态文件的效率非常好,就是利用了sendfile的特性
原来的Http Server的处理方式:
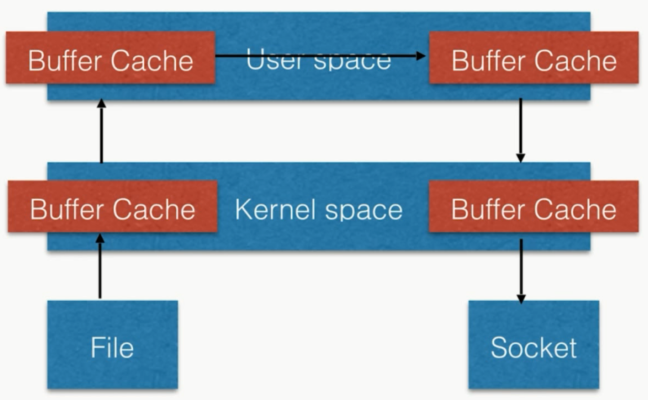
sendfile模式:把文件的传输直接从内核空间传输到socket,0拷贝
# 1.3 快速安装
设置官网yum源
vim /etc/yum.repos.d/nginx.repo/nginx.repo
将官网上的yum源头配置复制进去
[nginx-stable]
name=nginx stable repo
baseurl=http://nginx.org/packages/centos/7/$basearch/
gpgcheck=1
enabled=1
gpgkey=https://nginx.org/keys/nginx_signing.key
module_hotfixes=true
2
3
4
5
6
7
执行安装命令
yum install nginx
# 1.4 Nginx安装目录和配置语法
# 1.4.1 安装目录介绍
| 路径 | 类型 | 作用 |
|---|---|---|
| /etc/logrotate.d/nginx | 配置文件 | Nginx日志轮转,用于logrotate服务的日志切割 |
| /etc/nginx /etc/nginx/nginx.conf /etcynginx/conf.d /etc/nginx/conf.d/default.conf | 目录、配置文件 | Nginx主配置文件 |
| /etc/nginx/fastcgi_params /etc/nginx/uwsgi_params /etc/nginx/scgi_params | 配置文件 | cgi配置相关、fastcgi配置相关 |
| /etc/nginx/koi-utf /etc/nginx/koi-win /etc/nginx/win-utf | 配置文件 | 编码转换映射转化文件 |
| /etc/nginx/mime.types | 配置文件 | 设置http协议的Content-Type与扩展名对应关系 |
| /usr/lib/systemd/system/nginx-debug.service /usr/lib/systemd/system/nginx.service /etc/sysconfig/nginx /etc/sysconfig/nginx-debug | 配置文件 | 用于配置出系统守护进程管理器管理方式 |
| /usr/lib64/nginx/modules /etc/nginx/modules | 目录 | Nginx模块目录 |
| /usr/sbin/nginx /usr/sbin/ngink-debug | 命令 | Nginx服务的启动管理的终端命令 |
| /usr/share/doc/nginx-1.12.0 /usr/share/doc/nginx-1.12.0/COPYRIGHT /usr/share/man/man8/nginx.8.gz | 文件、目录 | Nginx的手册和帮助文档 |
| /var/cache/nginx | 目录 | Nginx的缓存目录 |
| /var/log/nginx | 目录 | Nginx的日志目录 |
# 1.4.2 编译参数
使用nginx - V可以查看nginx的安装编译参数:
--prefix=/etc/nginx --sbin-path=/usr/sbin/nginx --modules-path=/usr/lib64/nginx/modules --conf-path=/etc/nginx/nginx.conf --error-log-path=/var/log/nginx/error.log --http-log-path=/var/log/nginx/access.log --pid-path=/var/run/nginx.pid --lock-path=/var/run/nginx.lock --http-client-body-temp-path=/var/cache/nginx/client_temp --http-proxy-temp-path=/var/cache/nginx/proxy_temp --http-fastcgi-temp-path=/var/cache/nginx/fastcgi_temp --http-uwsgi-temp-path=/var/cache/nginx/uwsgi_temp --http-scgi-temp-path=/var/cache/nginx/scgi_temp --user=nginx --group=nginx --with-compat --with-file-aio --with-threads --with-http_addition_module --with-http_auth_request_module --with-http_dav_module --with-http_flv_module --with-http_gunzip_module --with-http_gzip_static_module --with-http_mp4_module --with-http_random_index_module --with-http_realip_module --with-http_secure_link_module --with-http_slice_module --with-http_ssl_module --with-http_stub_status_module --with-http_sub_module --with-http_v2_module --with-mail --with-mail_ssl_module --with-stream --with-stream_realip_module --with-stream_ssl_module --with-stream_ssl_preread_module --with-cc-opt='-O2 -g -pipe -Wall -Wp,-D_FORTIFY_SOURCE=2 -fexceptions -fstack-protector-strong --param=ssp-buffer-size=4 -grecord-gcc-switches -m64 -mtune=generic -fPIC' --with-ld-opt='-Wl,-z,relro -Wl,-z,now -pie'
| 编译参数 | 作用 |
|---|---|
| --prefix=/etc/nginx --sbin-path=/usr/sbin/nginx --modules-path=/usr/lib64/nginx/modules --conf-path=/etc/nginx/nginx.conf --error-log-path=/var/log/nginx/error.log --http-log-path=/var/log/nginx/access.log --pid-path=/var/run/nginx.pid --lock-path=/var/run/nginx.lock | 安装目的目录或路径 |
| --http-client-body-temp-path=/var/cache/nginx/client_temp --http-proxy-temp-path=/var/cache/nginx/proxy_temp --http-fastcgi-temp-path=/var/cache/nginx/fastcgi_temp --http-uwsgi-temp-path=/var/cache/nginx/uwsgi_temp --http-scgi-temp-path=/var/cache/nginx/scgi_temp | 执行对应模块时,Nginx所保留的临时性文件 |
| --user=nginx --group=nginx | 设定Nginx进程启动的用户和组用户 |
| --with-cc-opt=parameters | 设置额外的参数将被添加到CFLAGS变量 |
| -with-ld-opt=parameters | 设置附加的参数,链接系统库 |
# 1.4.3 配置文件结构
...               #全局块

events {          #events块
   ...
}

http {            #http块
    ...           #http全局块
    server {      #server块
        ...       #server全局块
        location [PATTERN] {  #location块
            ...
        }
        location [PATTERN] {
            ...
        }
    }
    server {
      ...
    }

    ...     #http全局块
}
2
3
4
5
6
7
8
9
10
11
12
13
14
15
16
17
18
19
20
21
22
23
- 全局块:配置影响nginx全局的指令。一般有运行nginx服务器的用户组,nginx进程pid存放路径,日志存放路径,配置文件引入,允许生成worker process数等。
- events块:配置影响nginx服务器或与用户的网络连接。有每个进程的最大连接数,选取哪种事件驱动模型处理连接请求,是否允许同时接受多个网路连接,开启多个网络连接序列化等。
- http块:可以嵌套多个server,配置代理,缓存,日志定义等绝大多数功能和第三方模块的配置。如文件引入,mime-type定义,日志自定义,是否使用sendfile传输文件,连接超时时间,单连接请求数等。
- server块:配置虚拟主机的相关参数,一个http中可以有多个server。
- location块:配置请求的路由,以及各种页面的处理情况。
配置文件示例:
########### 每个指令必须有分号结束。#################
#user administrator administrators; #配置用户或者组,默认为nobody nobody。
#worker_processes 2;                #允许生成的进程数,默认为1
#pid /nginx/pid/nginx.pid;          #指定nginx进程运行文件存放地址
error_log log/error.log debug;      #制定日志路径,级别。这个设置可以放入全局块,http块,server块,级别以此为:debug|info|notice|warn|error|crit|alert|emerg
events {
    accept_mutex on;                #设置网路连接序列化,防止惊群现象发生,默认为on
    multi_accept on;                #设置一个进程是否同时接受多个网络连接,默认为off
    #use epoll;                     #事件驱动模型,select|poll|kqueue|epoll|resig|/dev/poll|eventport
    worker_connections  1024;       #最大连接数,默认为512
}
http {
    include  mime.types;                    #文件扩展名与文件类型映射表
    default_type application/octet-stream;  #默认文件类型,默认为text/plain
    #access_log off;                        #取消服务日志
    log_format myFormat '$remote_addr–$remote_user [$time_local] $request $status $body_bytes_sent $http_referer $http_user_agent $http_x_forwarded_for'; #自定义格式
    access_log log/access.log myFormat;     #combined为日志格式的默认值
    sendfile on;                            #允许sendfile方式传输文件,默认为off,可以在http块,server块,location块。
    sendfile_max_chunk 100k;                #每个进程每次调用传输数量不能大于设定的值,默认为0,即不设上限。
    keepalive_timeout 65;                   #连接超时时间,默认为75s,可以在http,server,location块。

    upstream mysvr {
      server 127.0.0.1:7878;
      server 192.168.10.121:3333 backup;    #热备
    }
    error_page 404 https://www.baidu.com;   #错误页
    server {
        keepalive_requests 120;             #单连接请求上限次数。
        listen 4545;                        #监听端口
        server_name 127.0.0.1;              #监听地址
        location  ~*^.+$ {                  #请求的url过滤,正则匹配,~为区分大小写,~*为不区分大小写。
           #root path;                      #根目录
           #index vv.txt;                   #设置默认页
           proxy_pass http://mysvr;         #请求转向mysvr 定义的服务器列表
           deny 127.0.0.1;                  #拒绝的ip
           allow 172.18.5.54;               #允许的ip
        }
    }
}
2
3
4
5
6
7
8
9
10
11
12
13
14
15
16
17
18
19
20
21
22
23
24
25
26
27
28
29
30
31
32
33
34
35
36
37
38
39
# 1.4.4 基础配置语法
Nginx默认配置语法
| 配置 | 含义 |
|---|---|
| user | 设置nginx服务的系统使用用户 |
| worker_processes | 工作进程数 |
| error_log | nginx的错误日志 |
| pid | nginx服务启动时候pid |

其他配置介绍
http {
    # 涵盖了所有的content-type,并设置默认的content-type
    include       /etc/nginx/mime.types;
    default_type  application/octet-stream;

    # 日志格式,命名为main
    log_format  main  '$remote_addr - $remote_user [$time_local] "$request" '
                      '$status $body_bytes_sent "$http_referer" '
                      '"$http_user_agent" "$http_x_forwarded_for"';

    # 访问日志,使用main定义的日志格式
    access_log  /var/log/nginx/access.log  main;

    # 开启sendfile模式
    sendfile        on;
    #tcp_nopush     on;

    # 连接超时时间
    keepalive_timeout  65;

    #gzip  on;

    # 包含的子配置
    include /etc/nginx/conf.d/*.conf;
}
2
3
4
5
6
7
8
9
10
11
12
13
14
15
16
17
18
19
20
21
22
23
24
25
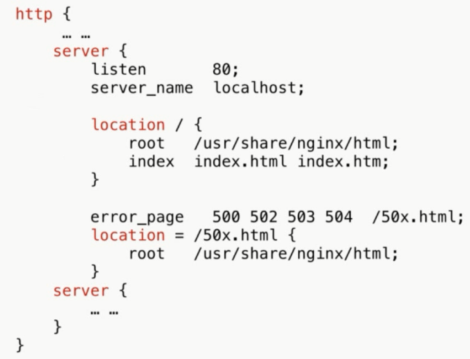
子配置文件初始只有一个 /etc/nginx/conf.d/default.conf
server {
    listen       80;
    server_name  localhost;

    #charset koi8-r;
    #access_log  /var/log/nginx/host.access.log  main;

    location / {
        root   /usr/share/nginx/html;
        index  index.html index.htm;
    }

    #error_page  404              /404.html;

    # redirect server error pages to the static page /50x.html
    #
    error_page   500 502 503 504  /50x.html;
    location = /50x.html {
        root   /usr/share/nginx/html;
    }

    # proxy the PHP scripts to Apache listening on 127.0.0.1:80
    #
    #location ~ \.php$ {
    #    proxy_pass   http://127.0.0.1;
    #}

    # pass the PHP scripts to FastCGI server listening on 127.0.0.1:9000
    #
    #location ~ \.php$ {
    #    root           html;
    #    fastcgi_pass   127.0.0.1:9000;
    #    fastcgi_index  index.php;
    #    fastcgi_param  SCRIPT_FILENAME  /scripts$fastcgi_script_name;
    #    include        fastcgi_params;
    #}

    # deny access to .htaccess files, if Apache's document root
    # concurs with nginx's one
    #
    #location ~ /\.ht {
    #    deny  all;
    #}
}
2
3
4
5
6
7
8
9
10
11
12
13
14
15
16
17
18
19
20
21
22
23
24
25
26
27
28
29
30
31
32
33
34
35
36
37
38
39
40
41
42
43
44
修改配置后重启nginx
killall -9 nginx
systemctl restart nginx.service
# 或者
systemctl reload nginx.service
2
3
4
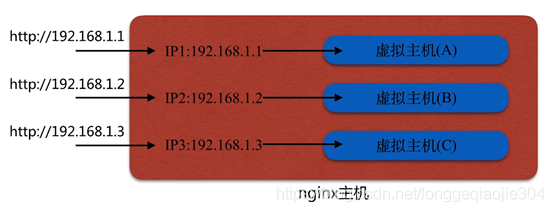
# 1.5 Nginx虚拟主机
# 1.5.1 Nginx虚拟主机及实现方式
多套业务服务如何配置?
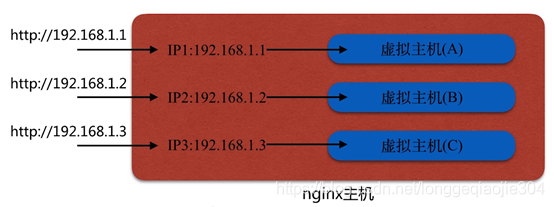
这种配置方式是非常低效的,一般企业也不会这么做。
虚拟主机配置
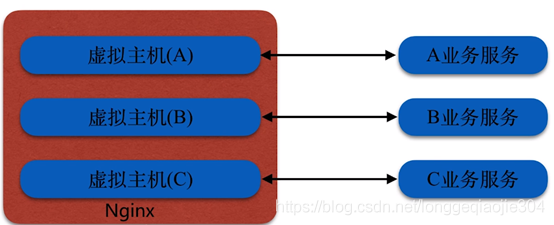
一个Nginx服务器中配置多个虚拟主机,一个Nginx代理服务器代理多个服务是企业里面非常常见的模式;
虚拟主机配置:在同一个Nginx上运行多套单独服务,这些服务是相互独立的;
配置方式有以下三种:
- 基于主机多IP方式
- 基于多port方式
- 基于多host名称方式(多域名方式)
单网卡多IP方式

多网卡多IP方式

查看网卡信息
[root@titan conf.d]# ifconfig
eth0: flags=4163<UP,BROADCAST,RUNNING,MULTICAST>  mtu 1500
        inet 10.0.0.206  netmask 255.255.255.0  broadcast 10.0.0.255
        ether fa:16:3e:38:f8:97  txqueuelen 1000  (Ethernet)
        RX packets 2347541  bytes 557726609 (531.8 MiB)
        RX errors 0  dropped 0  overruns 0  frame 0
        TX packets 2069558  bytes 343561987 (327.6 MiB)
        TX errors 0  dropped 0 overruns 0  carrier 0  collisions 0

lo: flags=73<UP,LOOPBACK,RUNNING>  mtu 65536
        inet 127.0.0.1  netmask 255.0.0.0
        loop  txqueuelen 1000  (Local Loopback)
        RX packets 4965296  bytes 266083612 (253.7 MiB)
        RX errors 0  dropped 0  overruns 0  frame 0
        TX packets 4965296  bytes 266083612 (253.7 MiB)
        TX errors 0  dropped 0 overruns 0  carrier 0  collisions 0

[root@titan conf.d]# ip a
1: lo: <LOOPBACK,UP,LOWER_UP> mtu 65536 qdisc noqueue state UNKNOWN group default qlen 1000
    link/loopback 00:00:00:00:00:00 brd 00:00:00:00:00:00
    inet 127.0.0.1/8 scope host lo
       valid_lft forever preferred_lft forever
2: eth0: <BROADCAST,MULTICAST,UP,LOWER_UP> mtu 1500 qdisc pfifo_fast state UP group default qlen 1000
    link/ether fa:16:3e:38:f8:97 brd ff:ff:ff:ff:ff:ff
    inet 10.0.0.206/24 brd 10.0.0.255 scope global eth0
       valid_lft forever preferred_lft forever
2
3
4
5
6
7
8
9
10
11
12
13
14
15
16
17
18
19
20
21
22
23
24
25
26
27
- lo网卡是回环网卡 虚拟网卡 它的IP地址是127.0.0.1,利用这个接口可以实现系统内部发送和接收数据
- eth0网卡是物理网卡
# 1.5.2 Nginx虚拟主机单网卡多IP配置
在网卡eth0上添加虚拟IP
# 添加虚拟ip之前,先验证下局域网IP是否存在,ping不通就行,证明不存在,可以添加
ping 10.0.0.207
ping 10.0.0.208

# 添加虚拟ip1
ip addr add 10.0.0.207/20 dev eth0
# 添加虚拟ip2
ip addr add 10.0.0.208/20 dev eth0
# 验证是否添加上了
ip a
1
2
3
4
5
6
7
8
9
10Nginx虚拟主机单网卡多IP配置
# 复制一份默认配置
cd /etc/nginx/conf.d
cp default.conf server1.conf
# 编辑server1.conf
vim server1.conf
# 以下为配置内容
server {
    listen       80;
    # 监听ip
    server_name  10.0.0.206;

    # 指向不同的文件
    location / {
        root   /usr/share/nginx/html/muti_ip;
        index  server1.html server1.htm;
    }
}
# 再来两份配置,并编辑内容
cp server1.conf server2.conf
cp server1.conf server3.conf
1
2
3
4
5
6
7
8
9
10
11
12
13
14
15
16
17
18
19
20重启nginx进程服务
nginx -s stop
nginx -c /etc/nginx/nginx.conf
1
2验证单网卡多IP配置是否生效
# 在配置的路径下创建server1.html、server2.html、server3.html
cd /usr/share/nginx/html
mkdir muti_ip
cp index.html muti_ip/server1.html
# 复制三份做不同的修改,方便辨别

# 验证效果
curl 10.0.0.206
curl 10.0.0.207
curl 10.0.0.208
1
2
3
4
5
6
7
8
9
10
# 1.5.3 Nginx虚拟主机单网卡多端口配置
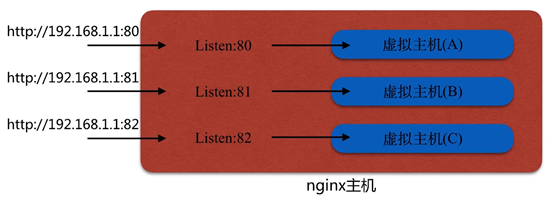
配置方式和单网卡多ip类似,只需要将上一节的三个server.conf指向统一ip,但是监听不同的端口就好了
vim /etc/nginx/conf.d/server1.conf

# 做以下修改
listen               81;             # 每个配置不同
server_name   localhost;   # 每个配置相同
2
3
4
5
重启nginx测试即可
# 1.5.4 Nginx虚拟主机多host域名配置

# 修改hosts文件
 vi /etc/hosts

 # 添加以下内容
127.0.0.1 lucifer1.com
127.0.0.1 lucifer2.com
127.0.0.1 lucifer3.com

# 修改上述三个 server.conf,都监听80端口,server_name分别为上一步配置的三个域名

# 重启nginx测试
2
3
4
5
6
7
8
9
10
11
# 1.6 Nginx日志
# 1.6.1 Nginx日志配置
nginx日志类型包含 error.log 和 access_log
user  nginx;
worker_processes  1;

# 错误日志路径,以及记录的日志等级
error_log  /var/log/nginx/error.log warn;
pid        /var/run/nginx.pid;


events {
    worker_connections  1024;
}


http {
    include       /etc/nginx/mime.types;
    default_type  application/octet-stream;

    # 定义日志格式,取名为main
    log_format  main  '$remote_addr - $remote_user [$time_local] "$request" '
                      '$status $body_bytes_sent "$http_referer" '
                      '"$http_user_agent" "$http_x_forwarded_for"';

    # 配置访问日志路径,使用main定义的格式
    access_log  /var/log/nginx/access.log  main;

    ......

    include /etc/nginx/conf.d/*.conf;
}
2
3
4
5
6
7
8
9
10
11
12
13
14
15
16
17
18
19
20
21
22
23
24
25
26
27
28
29
30
# 1.6.2 Nginx变量
- HTTP请求变量:arg_PARAMETER、http_HEADER、sent_http_HEADER
- 内置变量:Nginx内置的
- 自定义变量:自己定义
# 检测nginx配置的正确性
nginx -t -c /etc/nginx/nginx.conf
# 重新加载配置
nginx -s reload -c /etc/nginx/nginx.conf
2
3
4
Nginx默认log_format参数介绍:
| 参数 | 含义 |
|---|---|
| $remote_addr | 客户端请求地址 |
| $remote_user | 客户端请求验证的用户名,没有就是空 |
| $time_local | 本地时间 |
| $request | HTTP请求完整的原始请求行 |
| $status | 服务端响应的状态码 |
| $body_bytes_sent | 服务端返回给客户端字节大小 |
| $http_referer | 链接来源 |
| $http_user_agent | HTTP请求头里的 User_Agent,客户端类型 |
| $http_x_forwarded_for | 客户端请求的真实IP,如果代理存在,即有值,否则无值 |
配置参考:http://nginx.org/en/docs/syslog.html
# 1.7 Nginx模块讲解
包含:Nginx官方模块、第三方模块
使用nginx -V命令可以看到安装编译参数里以--with开头的是nginx开启的模块和粘连的模块
# 1.7.1 http_stub_status_module
作用:获取Nginx客户端的状态
Syntax:      stub_status
Default:     -
Context:     server, location
2
3
配置示例:
location = /my_nginx_status {
    stub_status;
}
2
3
访问 http: //{ip}/my_nginx_status查看nginx状态
curl localhost/my_nginx_status
# 以下为响应内容
Active connections: 1                      #活跃连接数
server accepts handled requests
 47 47 35                                         #已接受的客户端连接数  已处理的连接数  客户端连接数
Reading: 0 Writing: 1 Waiting: 0     #读取请求头的当前连接数  将响应写回客户端的当前连接数  等待请求的当前空闲客户端连接数
2
3
4
5
6
# 1.7.2 http_random_index_module
作用:目录中随机选择一个主页
Syntax:      random_index on|off;
Default:     andom_index on|off;
Context:     location
2
3
配置示例:
location / {
    root   /usr/share/nginx/html;
    index  index_1.html index_2.html;
    random_index on;          #随机从上面指定的index中选择一个返回
}
2
3
4
5
# 1.7.3 http_sub_module
作用:HTTP内容替换
这个模块的配置需要几个配置配合使用
(1) sub_filter
配置替换规则,定义被替换的内容和目标内容。
# 将 string 替换成 replacement
Syntax:      sub_filter string replacement;
Default:     -
Context:     http,server,location
2
3
4
(2) sub_filter_last_modified
表示允许在替换期间保留原始响应中的“Last-Modified”头字段,以便于响应缓存
Syntax:      sub_filter_last_modified on | off;
Default:     sub_filter_last_modified off;
Context:     http,server,location
2
3
(3) sub_filter_once
是否只替换第一次匹配的字符串,关闭表示替换所有匹配的
Syntax:      sub_filter_once on | off;
Default:     ssub_filter_once on;
Context:     http,server,location
2
3
(3) sub_filter_types
配置替换文件类型,“*”表示匹配所有MIME类型
Syntax:      sub_filter_types mime-type ...;
Default:     sub_filter_types text/html;
Context:     http,server,location
2
3
配置示例
location / {
    sub_filter 'java' 'JAVA';
    sub_filter '打call' '打电话';
    sub_filter_once off;
}
2
3
4
5
# 1.8 Nginx连接、请求限制
# 1.8.1 HTTP协议的连接与请求
- HTTP请求建立在一次TCP连接基础上
- 一次TCP请求至少产生一次HTTP请求
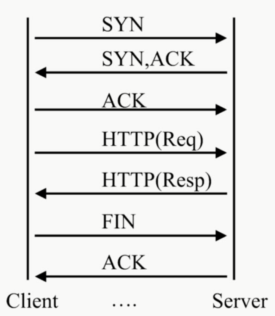
TCP三次握手
- 第一次:建立连接时,客户端发送syn包(syn=j)到服务器,并进入SYN_SENT状态,等待服务器确认;SYN:同步序列编号(Synchronize Sequence Numbers)。
- 第二次:服务器收到syn包,必须确认客户的SYN(ack=j+1),同时自己也发送一个SYN包(syn=k),即SYN+ACK包,此时服务器进入SYN_RECV状态;
- 第三次:客户端收到服务器的SYN+ACK包,向服务器发送确认包ACK(ack=k+1),此包发送完毕,客户端和服务器进入ESTABLISHED(TCP连接成功)状态,完成三次握手。
完成三次握手,客户端与服务器开始传送数据,在上述过程中,还有一些重要的概念:
TCP状态标识位
- YN表示建立连接
- FIN表示关闭连接
- ACK表示响应,
- PSH表示有DATA数据传输
- RST表示连接重置。
位码,即tcp标志位,有6种标示:
- SYN(synchronous建立联机)
- ACK(acknowledgement 确认)
- PSH(push传送)
- FIN(finish结束)
- RST(reset重置)
- URG(urgent紧急)
- Sequence number(顺序号码)
- Acknowledge number(确认号码)
HTTP版本差异:
| HTTP协议版本 | 连接关系 |
|---|---|
| HTTP1.0 | TCP不能复用 |
| HTTP1.1 | 顺序性TCP复用 |
| HTTP2.0 | 多路复用TCP复用 |
# 1.8.2 连接限制相关配置
(1) limit_conn_zone
设置共享内存区域的参数,该区域将保留各种key的状态,用来限制请求用。 具体而言,状态包括当前连接数。key可以包含文本、变量及其组合。key值为空的请求不被计算在内。
Syntax:      limit_conn_zone key zone=name:size;
Default:     -
Context:     http
2
3
示例:
#定义一个10m大小名为"addr"的共享空间,用以存放连接状态,状态以$binary_remote_addr作为key
limit_conn_zone $binary_remote_addr zone=addr:10m;
2
http://nginx.org/en/docs/http/ngx_http_limit_conn_module.html#limit_conn_zone
(2) limit_conn
为给定的key值设置共享内存空间和允许的最大连接数。 当超过此限制时,服务器将在响应请求时返回错误。
Syntax:      limit_conn zone number;
Default:     sub_filter_types text/html;
Context:     http,server,location
2
3
示例:
#参看上一项配置,将连接状态保存在"addr"共享空间中
limit_conn_zone $binary_remote_addr zone=addr:10m;

server {
    location /download/ {
        #设置共享空间为"addr,允许并发连接数最大为10个
        limit_conn addr 10;
    }
2
3
4
5
6
7
8
http://nginx.org/en/docs/http/ngx_http_limit_conn_module.html#limit_conn
# 1.8.3 请求限制相关配置
(1) limit_req_zone
设置共享内存区域的参数,该区域将保留各种key的状态。该状态存储当前超出的请求数量。 key可以包含文本、变量及其组合。key值为空的请求不被计算在内
Syntax:      limit_req_zone key zone=name:size rate=rate [sync];
Default:     -
Context:     http
2
3
示例:
#定义10大小名为"one"的共享空间,用以存放请求状态,状态以$binary_remote_addr作为key,并且该空间的平均请求处理速率不能超过 1 request/s
limit_req_zone $binary_remote_addr zone=one:10m rate=1r/s;
2
(2) limit_req
配置共享内存突发请求的大小和最大值。 如果请求速率超过空间配置的速率,则其处理将延迟,以便以规定的速率处理请求。 超出的请求会被延迟,直到它们的数量超过最大突发大小,在这种情况下,请求会因错误而终止。 默认情况下,最大突发大小等于零。
#[burst=number] 表示突发请求数(最大请求数)
#[nodelay | delay=number] 其中nodelay表示请求没有延迟,超出的请求丢失;delay=number表示可以延迟处理请求的数量。默认值为delay=0,即所有多余的请求都被延迟
Syntax:      llimit_req zone=name [burst=number] [nodelay | delay=number];
Default:     -
Context:     http
2
3
4
5
示例:
#平均每秒允许不超过1个请求
limit_req_zone $binary_remote_addr zone=one:10m rate=1r/s;

server {
    location /search/ {
        #突发请求不超过5个
        limit_req zone=one burst=5;
    }
}
2
3
4
5
6
7
8
9
测试
#使用ab工具,发起并发请求,请求总数50个,同时并发20个
ab -n 50 -c 20 http://localhost
2
# 1.9 Nginx访问控制
- 基于IP的访问控制:http_access_module
- 基于用户的信任登录:http_auth_basic_module
# 1.9.1 基于ip的访问控制
使用 http_access_module 配置基于ip的访问控制
(1) allow
允许指定ip、网段、socket访问
Syntax:      allow address | CIDR | unix: | all;
Default:     -
Context:     http, server, location, limit_except
2
3
(2) deny
拒绝指定ip、网段、socket访问
Syntax:      deny address | CIDR | unix: | all;
Default:     -
Context:     http, server, location, limit_except
2
3
示例
location / {
    deny  192.168.1.1;
    allow 192.168.1.0/24;
    allow 10.1.1.0/16;
    allow 2001:0db8::/32;
    deny  all;
}
2
3
4
5
6
7
http_access_module的局限性
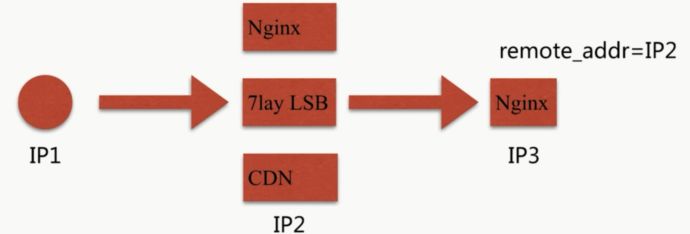
上图所示如果限制了IP1不能访问,nginx是使用http请求头的remote_addr进行ip限制的。但如果IP1使用IP2进行代理访问,IP2没有被限制,IP1就能拿通过代理访问到资源。
在此介绍x_forwarded_for
X-Forwarded-For(XFF)是用来识别通过HTTP代理或负载均衡方式连接到Web服务器的客户端最原始的IP地址的HTTP请求头字段。
简而言之,就是可以追踪你的请求链路经过了哪几个IP,如下图所示:
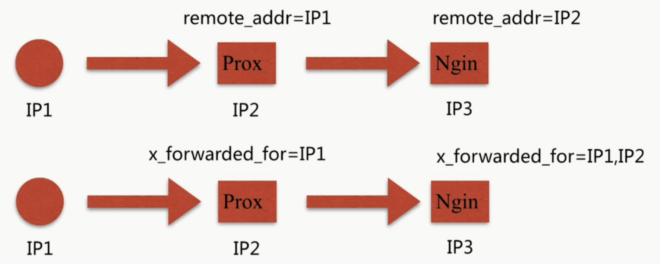
http_xforwarded for =Client IP,Proxy(1)IP,Proxy(2)IP,..
如何解决 http_access_module 的局限性?
- 方法一:采用别的HTTP头信息控制访问,如:HTTP-_XFORWARD_FOR(客户端不一定支持,也有被修改的可能)
- 方法二:结合geo模块作
- 方法三:通过HTTP自定义变量传递
# 1.9.2 基于用户认证访问控制
使用http_auth_basic_module配置基于用户认证的访问控制
(1) auth_basic
是否开启身份认证,开启的话,指定认证失败的提示语
#off表示关闭,string是认证失败的提示语
Syntax:      auth_basic string | off;
Default:     auth_basic off;
Context:     http, server, location, limit_except
2
3
4
(2) auth_basic_user_file
指定认证用户名密码的存放文件路径
#file表示用户名密码文件
Syntax:      auth_basic_user_file file;
Default:     -
Context:     http, server, location, limit_except
2
3
4
用户名密码文件规则:
#comment
name1:password1
name2:password2:comment
name3:password3
2
3
4
示例
location / {
    #开启身份认证,失败提示语为 "auth error!"
    auth_basic           "auth error!";
    #指定用户名密码文件路径
    auth_basic_user_file conf/htpasswd;
}
2
3
4
5
6
http_access_module的局限性
- 用户信息依赖文件方式
- 操作管理机械,效率低下
解决方案
- 方案一:Nginx结合LUA实现高效验证
- 方案二:Nginx和LDAP打通,利用nginx-auth-ldap模块