 第04章-Redis其他功能
# 一、慢查询
# 1.1 请求的生命周期
客户端请求 redis 的一个完整生命周期:
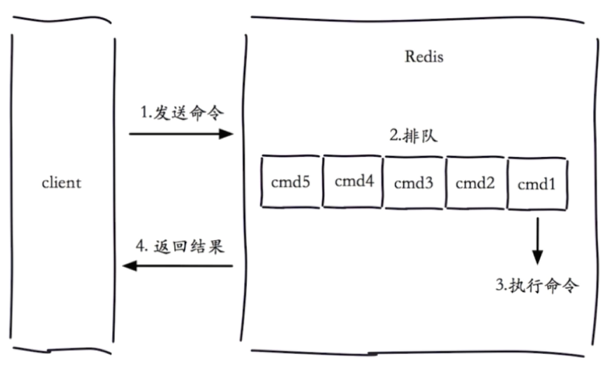
- 客户端发送命令
- 命令到达 redis 中排队(单线程)
- 执行命令
- 返回结果到客户端
关于慢查询的两点说明:
- 慢查询发生在第 3 阶段
- 客户端超时不一定慢查询,但慢查询是客户端超时的一个可能因素
# 1.2 慢查询配置
redis 针对慢查询日志有两个配置,分别为 slowlog-max-len 和 slowlog-log-slower-than
# slowlog-max-len
slowlog-max-len 表示慢查询日志队列的固定长度。慢查询会记录进一个队列,特点如下:
- 先进先出的队列
- 队列长度固定
- 队列保存在内存中
如下图左边所示,如果一条命令执行时间超过 10000 微秒(slowlog-log-slower-than),则进入慢查询队列(slowlog list),队列的长度是 100(slowlog-max-len)。图中右边表示 slowlog100 ~ slowlog1 的慢查询数据。
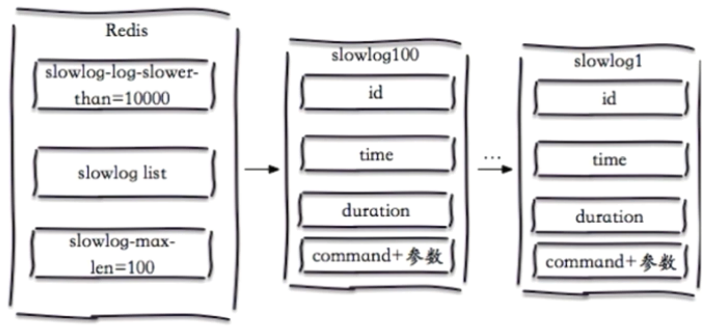
# slowlog-log-slower-than
slowlog-log-slower-than 表示慢查询阈值(单位:毫秒),有以下特点:
slowlog-log-slower-than=0,记录所有的命令slowlog-log-slower-than<0,不记录任何命令
# 配置方式
获取默认值:
> config get slowlog-max-len
 1)  "slowlog-max-len"
 2)  "128"
> config get slowlog-log-slower-than
 1)  "slowlog-log-slower-than"
 2)  "10000"
2
3
4
5
6
配置方式一:修改配置文件,重启 redis
配置方式一:动态配置,无需重启
> config set slowlog-max-len 1000
> config set slowlog-log-slower-than 1000
1
2
# 1.3 慢查询命令
slowlog get [n]:获取慢查询队列记录slowlog len:获取慢查询队列长度slowlog reset:清空慢查询队列
# 1.4 运维经验
slowlog-log-slower-then不要设置过大,默认 10ms,通常设置 1msslowlog-max-len不要设置过小,通常设置 1000 左右- 理解命令生命周期
- 定期持久化慢查询日志(存在内存中的,持久化方便后续分析)
# 二、pipeline 流水线
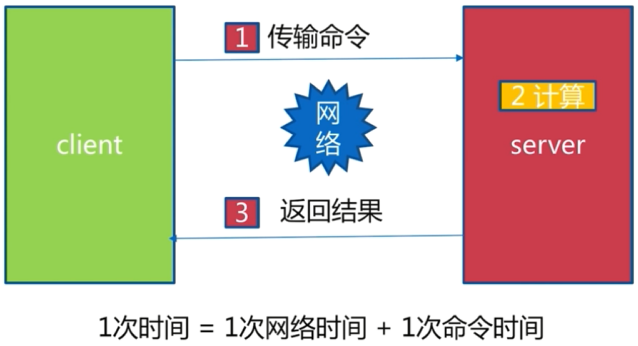
# 2.1 什么是流水线
1 次网络命令通信模型
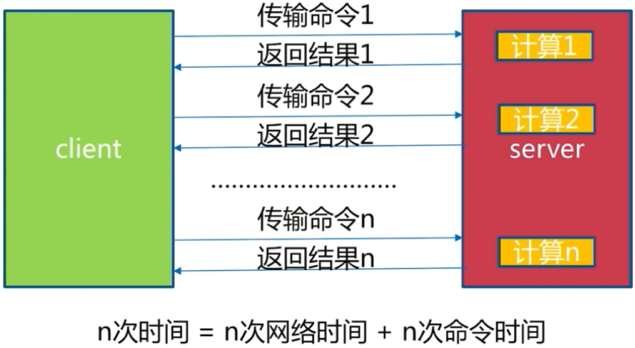
批量网络命令通信模型
流水线命令网络模型
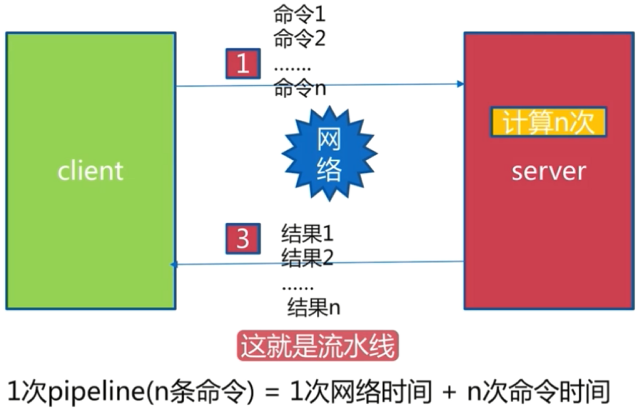
# 2.2 流水线的作用
| 命令 | n 个命令操作 | 1 次 pipeline(n 个命令) |
|---|---|---|
| 时间 | n 次网络 + n 次命令 | 1 次网络 + n 次命令 |
| 数据量 | 1 条命令 | n 条命令 |
注意两点:
- redis 执行命令通常是微秒级别的
- pipeline 每次条数要控制(网络)
# 2.3 Java 中使用 pipeline
引入依赖
<dependency>
	<groupId>redis.clients</groupId>
    <artifactId>jedis</artifactId>
    <version>2.9.0</version>
    <type>jar</type>
    <scope>compile</scope>
</dependency>
2
3
4
5
6
7
场景:执行 10000 次 hset 操作,生成 10000 个哈希。(不能使用 hmset,hmset 是生成一个 hash,里面 n 个 field-value 对)
不使用 pipeline 的情况,10000 次网络 + 10000 次命令,要 50s
// ======== 不使用 pipeline ========
Jedis jedis = new Jedis("127.0.0.1", 6379);
for (int i = 0; i < 10000; i++) {
    jedis.hset("hashkey:" + i, "field" + i, "value" + i);
}
2
3
4
5
使用 pipeline,分 100 次,每次携带 100 条命令,100 次网络 + 10000 次命令,要 0.7s
// ======== 使用 pipeline ========
Jedis jedis = new Jedis("127.0.0.1", 6379);
// 分 100 次 pipeline 操作
for (int i = 0; i < 100; i++) {
    Pipeline pipeline = jedis.pipelined();
    for (int j = i * 100; j < (i + 1) * 100; j++) {
        // 每次携带命令数量 100
        pipeline.hset("hashkey:" + j, "field" + j, "value" + j);
    }
    // 执行携带了 100 条命令的 pipeline
    pipeline.syncAndReturnAll();
}
2
3
4
5
6
7
8
9
10
11
12
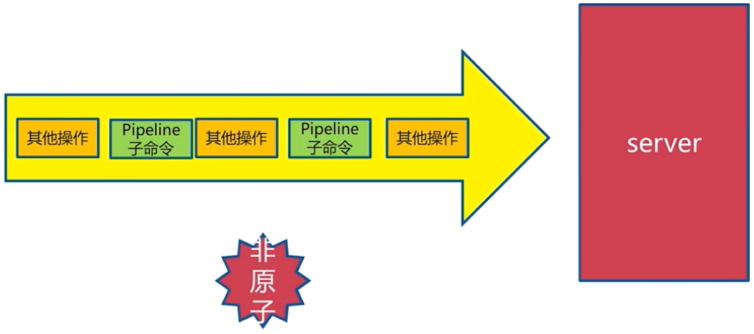
# 2.4 pipeline 和批量操作
m 操作(批量操作)是一条命令,是原子的
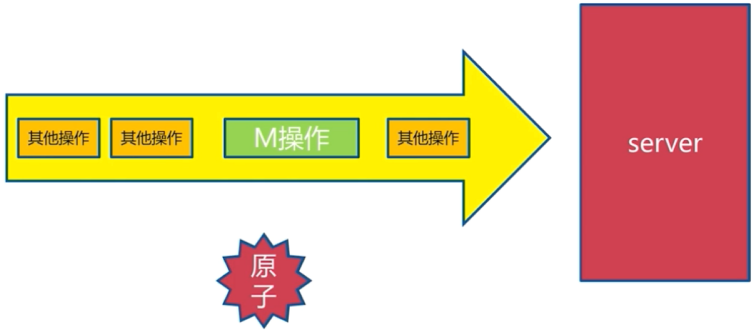
pipeline 操作到达 redis 会被拆分,是非原子的
# 2.5 pipeline 注意事项
- 注意每次 pipeline 携带数据量
- pipeline 每次只能作用在一个 Redis 节点上
- 注意 M 操作与 pipeline 区别
# 三、发布订阅
# 2.1 发布订阅模式
redis 发布订阅模式中有以下角色
- 发布者(publisher):发布消息频道
- 订阅者(subscriber):订阅频道
- 频道(channel):接收发布者的消息分发给订阅者
发布订阅消息模型:
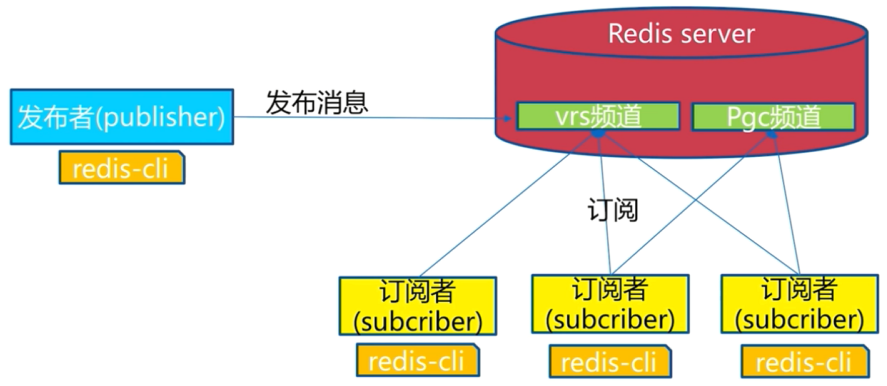
- 发布者发布消息到频道 A,订阅频道 A 的所有订阅者都能收到消息
- redis 发布订阅模式没有消息堆积能力,订阅者只能收到订阅之后发出的消息。
# 2.2 发布订阅API
publish channel message:发布消息到频道,返回订阅者个数subscribe [channel]:订阅一个或多个频道,会收到消息和对应的频道unsubscribe [channel]:取消订阅一个或多个频道
# ===== 发布消息 =====
redis> publish sohu:tv "hello world"
(integer) 3 # 订阅者个数
redis> publish sohu:auto "taxi"
(integer)

# ===== 订阅消息 =====
redis> subscribe sohu:tv
1) "subscribe"
2) "sohu:tv"
3) (integer) 1
1) "message"
2) "sohu:tv"
3) "hello world"

# ===== 取消订阅 =====
redis> unsubscribe sohu:tv
1) "unsubscribe"
2) "sohu:tv"
3) (integer)0
2
3
4
5
6
7
8
9
10
11
12
13
14
15
16
17
18
19
20
其他 API
> psubscribe [pattern...]      # 订阅模式
> punsubscribe [pattern...]    # 退订指定的模式
> pubsub channels              # 列出至少有一个订阅者的频道
> pubsub numsub [channel...]   # 列出给定频道的订阅者数量
> pubsub numpat                # 列出被订阅模式的数量
2
3
4
5
# 四、Bitmap
# 4.1 Bitmap 位图
Bitmap 实际是字符串的二进制表示形式。
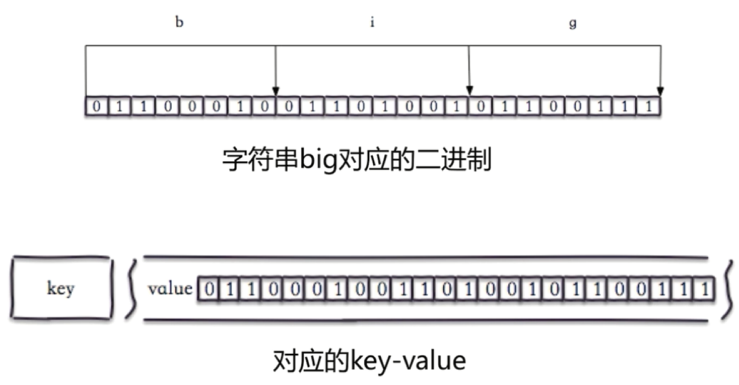
图中字符串 "big" 中字符 'b' 的 ASCII 码是 98,应对的二进制数是 01100010,其他字符同理,就得到了 "big" 的二进制表示。
> set hello big    # 设置字符串,key: hello,value: big
OK
> getbit hello 0   # 获取 hello 值的第 0 位
(integer) 0
> getbit hello 1   # 获取 hello 值的第 1 位
(integer) 1
2
3
4
5
6
上述命令,操作的就是字符串 "big" 对应的二进制。即在 redis 中,是可以直接操作位的。
# 4.2 位图 API
命令一:setbit
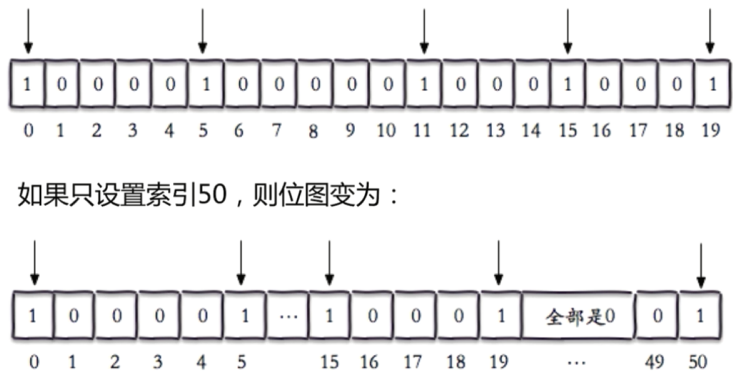
setbit key offset value:给位图指定索引设置值
> setbit unique:users:2016-04-05 0 1
(integer) 0
> setbit unique:users:2016-04-05 5 1
(integer) 0
> setbit unique:users:2016-04-05 1 11
(integer) 0
> setbit unique:users:2016-04-05 15 1
(integer) 0
> setbit unique:users:2016-04-05 19 1
(integer) 0
2
3
4
5
6
7
8
9
10
设置的 offset 超过原来位图长度,会直接自动拉长,中间补零 0,如下图所示
命令二:getbit
getbit key offset:获取位图指定索引的值
> getbit unique:users:2016-04-05 8
(integer) 0
> getbit unique:users:2016-04-05 19
(integer) 1
2
3
4
命令三:bitcount
bitcount key [start end]:获取位图指定范围位值为 1 的个数 (start 到 end,单位为字节,如果不指定就是获取全部)
> bitcount unique:users:2016-04-05
(integer) 5
> bitcount unique:users:2016-04-05 1 3
(integer) 3
2
3
4
命令四:bitop
bitop op destkey key [key...]: 做多个 Bitmap 的 and(交集)、or(并集)、not(非)、xor(异或) 操作并将结果保存在 destkey 中
# 并求两个位图的并集
> bitop and unique:users:and:2016_0404-2016_04_05 unique:users:2016-04-05 unique:users:2016-04-04
(integer) 3
> bitcount unique:users:and:2016_0404-2016_04_05
(integer) 2
2
3
4
5
命令五:bitpos
bitpos key targetBit [start] [end]: 计算位图指定范围第一个偏移量对应的值等于 targetBit 的位置 (start 到 end,单位为字节,如果不指定就是获取全部)
# 类似于 indexOf
> bitpos unique:users:2016-04-04 1
(integer) 1
> bitpos unique:users:2016-04-04 0 1 2
(integer) 8
2
3
4
5
# 4.3 独立用户统计
场景:某网站有 n 个用户,现需要记录每天访问的独立用户
假设有一亿用户,5 千不同用户访问。要存储这一亿用户 id 中的 5 千万条,有以下方案:
- set:将用户 id 存到 set 中去
- bitmap:bitmap 中每一位代表一个用户,先将所有的用户置 0,然后 1 代表用户访问了。
| 数据类型 | 每个 userId 占用空间 | 要存储的用户量 | 所需内存 |
|---|---|---|---|
| set | 32位(假设整型) | 50,000,000 | 32位 * 50,000,000 = 200MB |
| bitmap | 1位 | 100,000,000 | 1位 * 100,000,000 = 12.5MB |
长期使用所需内存:
| 数据类型 | 一天 | 一月 | 一年 |
|---|---|---|---|
| set | 200MB | 6G | 72G |
| bitmap | 12.5MB | 375MB | 4.5G |
如果是只有 10 万用户访问,那么:
| 数据类型 | 每个 userId 占用空间 | 要存储的用户量 | 所需内存 |
|---|---|---|---|
| set | 32位(假设整型) | 100,000 | 32位 * 100,000 = 4MB |
| bitmap | 1位 | 100,000,000 | 1位 * 100,000,000 = 12.5MB |
此时使用 set 更节省空间。
# 4.4 Bitmap 使用经验
- Bitmap 实际就是字符串,最大存储 512MB
- 注意 setbit 时的偏移量,可能有较大耗时
- 位图不是绝对好
# 五、HyperLoglog
# 5.1 HyperLoglog 介绍和使用
HyperLoglog 介绍
基于 HyperLoglog 算法:极小空间完成独立数据统计
本质还是字符串
> type hyperloglog_key
string
1
2
三个相关命令
pfadd key element [element...]:向 hyperloglog 添加元素pfcount key [key...]:计算 hyperloglog 的独立总数pfmerge destkey sourcekey [sourcekey...]:合并多个 hyperloglog
使用演示
# 操作3月5日的用户数据
redis> pfadd 2017_03_06:unique:ids "uuid-1" "uuid-2" "uuid-3" "uuid-4"
(integer) 1
redis> pfcount 2017_03_06:unique:ids
(integer) 4
redis> pfadd 2017_03_06:unique:ids "uuid-1" "uuid-2" "uuid-3" "uuid-90"
(integer) 1
redis> pfcount 2017_03_06:unique:ids
(integer) 5

# 操作3月6日的用户数据
redis> pfadd 2016_03_06:unique:ids "uuid-1" "uuid-2" "uuid-3" "uuid-8"
(integer) 1
redis> pfcount 2016_03_06:unique:ids
(integer) 4

# 合并数据
redis> pfmerge 2016_03_05_06:unique:ids 2016_03_05:unique:ids 2016_03_06:unique:ids
OK
redis> pfcount 2016_03_05_06:unique:ids
(integer) 6
2
3
4
5
6
7
8
9
10
11
12
13
14
15
16
17
18
19
20
21
# 5.2 使用经验
# shell 脚本表,向 HyperLoglog 中插入百万数据
elements=""
key="2016_05_01:unique:ids"
for i in 'seq 1 1000000`
do
    elements="${elements} uuid-"${i}
    if [[$((i % 1000)) == 0]]
    then
    	redis-cli pfadd ${key} ${elements}
    	elements=""
    fi
done
2
3
4
5
6
7
8
9
10
11
12
上述脚本插入百万数据后,HyperLoglog 仅仅占用 15KB 内存。
使用 HyperLoglog 的局限:
- 是否能容忍错误?(错误率:0.81%)
- 是否需要单条数据?(不能取出单条数据)
# 六、GEO
GEO(地理信息定位):存储经纬度,计算两地距离,范围计算等
# 6.1 GEO 的 API
geoadd
geoadd key longitude latitude member [longitude latitude member...] :增加地理位置信息
> geoadd cities:locations 116.28 39.55 beijing
(integer) 1
> geoadd cities:locations 116.28 39.55 beijing
(integer) 1
> geoadd cities:locations 117.12 39.08 tianjin 114.29 38.02 shijiazhuang 118.0139.38 tangshan 115.29 38.51 baoding
(integer) 4
2
3
4
5
6
geopos
geopos key member [member...]:获取地理位置信息
> geopos cities:locations tianjin
1) 1) "117.12000042200088501"
   2) "39.0800000535766543"
2
3
geodist
geodist key member1 member2 [unit]: 获取两个地理位置的距离,unit:m(米)、km(干米)、mi(英里)、ft(尺)
> geodist cities:locations tianjin beijing km
"89.2061"
2
georadius
georadius 以给定的经纬度为中心,返回键包含的位置元素当中,与中心的距离不超过给定最大距离的所有位置元素。
API介绍:
georadius key longitude latitude radiusm|km|ft|mi [withcoord] [withdist] [withhash] [COUNT count][asc|desc] [store key] [storedist key]

georadiusbymember key member radiusm|km|ft|mi [withcoord] [withdist] [withhash] [COUNT count] [asc|desc] [store key] [storedist key]

withcoord:     返回结果中包含经纬度。
withdist:      返回结果中包含距离中心节点位置。
withhash:      返回结果中包含 geohash COUNT count: 指定返回结果的数量。
ascldesc:      返回结果按照距离中心节点的距离做升序或者降序。
store key:     将返回结果的地理位置信息保存到指定键。
storedist key: 将返回结果距离中心节点的距离保存到指定键s
使用示例:
> georadiusbymember cities:locations beijing 150 km
1) "beijing"
2) "tianjin"
3) "tangshan"
4) "baoding"
2
3
4
5
# 6.2 使用说明
- since 3.2+
- geo 是使用 zset 实现的,type geokey = zset
- 没有删除 API,使用 zset 方式删除:
zrem key member